Contact
IPS Implants® Preprosthetic

IPS Implants®

IPS Implants® Preprosthetic

The IPS® family now includes IPS Implants® Preprosthetic. The Department of Oral and Maxillofacial Surgery at the Hannover Medical School (MHH) has developed a functionally stable framework implant. It is manufactured using a 3D laser melting process. Since 2015, more than 250 patients have already opted for IPS Implants® Preprosthetic and can benefit from the advantages of the new immediate dental rehabilitation. We are the clinic's cooperation partner.

Conventional, dental implantology is an established option for dental rehabilitation, as long as the individual bone and soft tissue are sufficient. In the case of major tissue loss or replacement, however, conventional methods are limited. This is precisely where the new possibilities with IPS Implants® Preprosthetic offer an excellent extension to achieve functionally stable immediate dental rehabilitation independent of the jaw region.

The implant offers high stability with comparatively moderate treatment costs and significantly shorter treatment duration.
IPS Implants® Preprosthetic can be individually adapted to the patient situation by means of shape-free fabrication in combination with conventional fabrication procedures. The framework structure and the post length can be individually adapted to the defect situation. The useful supra structure can be fixed to the posts using a rotation-stable cone with or without screws.

Indications

  • Extreme atrophy or loss of jawbone
  • Individual limiting factors
  • Trauma patients
  • Reconstructions necessitated by tumors, ulcers or cysts

Surgical technique | 7 steps to functionally stable immediate dental rehabilitation

1. Virtual planning

1. Virtual planning

To create the case, the patient data and case-related information are uploaded to the web-based platform IPS Gate®. The data is prepared by the IPS® developer for case planning on the basis of the user's requirements and information. An integrated chat function and web meetings are available for direct communication between the IPS® developer and user. With the clinical specifications and requirements the number and position of the posts are defi ned. If necessary, the anatomical region is mirrored. Subsequently, a patient specifi c optimized implant is generated. In the end, the user approves the design for production.

2. Pre-surgical presentation

2. Pre-surgical presentation

Initial situation after resection of a benign tumor and soft tissue reconstruction by a "M. latissimus dorsi" transplant.

3. Implantation preparation

The surgery situs in the right midface is opened intraorally. A remote fi xation is even more important because of the missing right maxilla. The soft tissue is dissected from the previously defi ned bony structures.

4. Implant fixation

The implant is inserted into the surgery situs and fi ts exactly and precisely due to the patient specifi c construction. The IPS® scaff olding base is fi xed functionally stable and multi-vectorial with standard (Ø 1.5 mm or Ø 2.0 mm) and/or locking screws (Ø 2.0 mm) depending on the planning. Upon request and depending on the intraoperative conditions not every fi xation possibility in the implant has to be used with a screw.

5. Post passage creation

Creation of the post passages through the soft tissue. At the same time, the precise position can be relevant not to impair the anatomical entities.

6. Soft tissue situation

The rotation-stable telescopes of the posts may not be covered by soft tissue after wound closure.

7. Temporary denture fixation

Last, the temporary denture is fixed per post intraoperatively on IPS Implants® Preprosthetic with the supplied IPS® screw denture fixation. Please pay attention of enough space between the soft tissue and the denture because pressure on the soft tissue can be created by postoperative tissue swelling. Upon request the temporary denture can be created with or without occlusion contact.

Surgical technique | Postoperative treatment - digital

Commencing with the final prosthetic restoration

Commencing with the final prosthetic restoration

The intraoral scans for the final prosthetic restoration are prepared on site by the treating dentist as soon as postoperative tissue swelling has subsided.

The following steps are comparable to the procedure for standard dental implants. Scanbodies are not necessary due to the abutments integrated in the implant pillar. The custom-made implant is available in IPS Gate® as an STL file.

The temporary denture is removed using the screwdriver.

Creation of the intraoral scan

Creation of the intraoral scan

The intraoral scans are then prepared for the digital creation of the prosthetic restoration. Here, the scans of the maxilla and mandible are created separately. The third scan is required to map the bite situation in occlusion. The three scans are then merged digitally.

Finally, the temporary denture is screwed back onto the abutments.

Important note:
When treating a patient with an edentulous maxilla or mandible, an impression and plaster cast are required in addition to the intraoral scans.

Digital designing of the bar solution

Digital designing of the bar solution

First, the STL file of the implant and the intraoral scan are imported into a standard CAD/CAM software solution for dental technology (see page 24, right column), then superimposed and aligned. The bar solution can then be designed based on the abutments and the soft tissue situation.

Optional:
Thanks to the digital workflow in the planning and fabrication of IPS Implants® Preprosthetic, the bar can already be fabricated immediately postoperatively during the healing period. For this purpose, the implant is scanned preoperatively with a physical scanner by the user.

This simplifies fabrication of the final denture, which can then be inserted as soon as the swelling has subsided.

Creation of the bar

Creation of the bar

After the bar is designed, it is fabricated mechanically, which includes the holes for the abutments and the locking mechanism.

The final finishing of the bar is performed by grinding and polishing.

Digital design of the final denture

Digital design of the final denture

The previously prepared digital tooth model with the bar is imported into CAD/CAM software for dental technology. In addition, the scan in occlusion is now also used to optimally align the tooth crowns with each other. Now the denture is designed to match the existing residual dentition and the available soft tissue situation.

Creation of the final denture

Creation of the final denture

The final denture is now fabricated. For easy handling, guidance with a matrix (denture) and patrix (bar) is recommended.

The final denture is subsequently fixed to the bar by a locking mechanism.

Final prosthetic restoration

Finale prothetische Versorgung

The bar serves as a mount for the removable and lockable superstructure (denture). It can now be checked whether the matrix and patrix fit perfectly into each other.

Insertion of the final prosthetic restoration

Insertion of the final prosthetic restoration

The final prosthetic restoration is inserted at another visit of the patient to the treating physician.

First, the temporary denture is removed using the screwdriver. The bar is placed on the abutments and fixed either with the existing or with new prosthetic screws and the screwdriver.

The final denture is then slid onto the bar and locked in place.

Note:
The bar and the denture are not part of our product portfolio.

Surgical technique | Postoperative treatment - analog

Commencing with the final prosthetic restoration

Commencing with the final prosthetic restoration

The impression for the final prosthetic restoration is taken on site by the treating dentist as soon as postoperative tissue swelling has subsided.

The following steps are comparable to the procedure for standard dental implants. Among other things, the prosthetic products are now used.

The temporary denture is removed using the screwdriver. One impression cap each is placed onto the end of each of the integrated abutment.

Closed impression taking

Closed impression taking

Using a closed impression tray and impression material, an impression of the intraoral situation is taken with any residual dentition. Due to the T-shaped design of the impression caps, these remain in the impression material when the tray is removed.

Subsequent curing of the material keeps the caps in their position. The temporary denture is then screwed back onto the abutments.

Inserting the analog pillars

Inserting the analog pillars

The impression material represents a negative model of the intraoral situation. An implant analog is inserted loosely in each impression cap. The two ends of the implant analog are an exact copy of the abutment at the end of the implant analog.

Casting the impression material

Casting the impression material

The negative model (impression material) is now transferred to the exact copy of the intraoral situation, the positive model (plaster model). For this purpose, the impression material and the implant analogs are cast with plaster.

Finished plaster model

Finished plaster model

After the plaster model has dried and cured, it can be separated from the impression material. During this process, the impression pillars remain fixed in the plaster. Now the exact copy of the intraoral situation is available as a plaster model.

One burnout cap each is placed on the end of each implant analog.

Creation of the wax-up

Creation of the wax-up

The wax-up of polymer (Pattern Resin) is created around the caps. Connected to this are the subsequent wax casting channels.

The wax-up, including the caps, can now be lifted off the implant analog in the plaster model.

Creation of the cast mold

Creation of the cast mold

The wax-up is rotated by 180° and placed in a mold. At the bottom of the mold is the subsequent filling funnel and in the middle there is a horizontal reservoir to ensure that sufficient casting metal can run in later.

The mold is filled with heat-resistant plaster, which completely encloses the wax-up. The plaster also runs into the burnout caps from above and thus forms an exact copy of the abutment there.

Curing and burnout of the casting mold

Curing and burnout of the casting mold

The mold is cured in the furnace. During this process, the wax-up and burnout caps are burned out. The construction evaporates in the process, leaving a cavity.

Casting process

Casting process

The still hot casting mold is rotated by 180°. Then the liquid casting metal can be poured into the mold.

Exposing the bar

Exposing the bar

After the cooling process, the plaster mold, the casting channels that are not required, and the filling funnel are removed, which exposes the bar.

Final bar design

Final bar design

The cast bar is finished by milling, drilling, grinding and polishing based on the plaster model.

The final bar serves as a mount for the removable and lockable superstructure (denture) which is now created. For easy handling, guidance with a matrix (denture) and patrix (bar) is recommended.

The denture is fixed to the bar by a locking mechanism.

Insertion of the final prosthetic restoration

Einsetzen der finalen prothetischen Versorgung

The final prosthetic restoration is inserted at another visit of the patient to the treating physician.

First, the temporary denture is removed using the screwdriver. The bar is placed on the abutments and fixed either with the existing or with new prosthetic screws and the screwdriver.

The final denture is then slid onto the bar and locked in place.

Note:
The bar and the denture are not part of our product portfolio.

Case studies | Treatment in one quadrant

Treatment of the right maxilla after hemimaxillectomy with one IPS Implants® Preprosthetic without a bone transplant.

Treatment of the left mandible with one IPS Implants® Preprosthetic. By preceding reconstruction a fibula transplant and an IPS Implants® Mandible Reconstruction are in situ.

Treatment of the mandible with one IPS Implants® Preprosthetic after preceding mandible reconstruction left with a double barrel fibula transplant for bony restoration.

Case studies | Treatment in two quadrants

Treatment of an atrophic maxilla

Treatment of an atrophic maxilla with two IPS Implants® Preprosthetic without transplantation. Alternatively, a construction with a connection bridge and consequently a one-piece implant is possible.

Treatment of the mandible with one IPS Implants® Preprosthetic

Treatment of the mandible with one IPS Implants® Preprosthetic. By preceding reconstruction a fibula transplant and an IPS Implants® Mandible Reconstruction are in situ.

Publications

Rahlf, B., P. Korn, AN. Zeller, S. Spalthoff, P. Jehn, F. Lentge, and NC. Gellrich. 2022. Novel approach for treating challenging implant-borne maxillary dental rehabilitation cases of cleft lip and palate: a retrospective study. International Journal of Implant Dentistry 8 (6). https://doi.org/10.1186/s40729-022-00401-x

Spalthoff, S., M. Borrmann, P. Jehn, B. Rahlf, NC. Gellrich, and P. Korn. 2022. Comparison of conventional and digital workflow for dental rehabilitation with a novel patient-specific framework implant system: an experimental dataset evaluation. International Journal of Implant Dentistry 8 (4). https://doi.org/10.1186/s40729-022-00405-7

Korn, P., NC. Gellrich, P. Jehn, S. Spalthoff, and b. Rahlf. 2021. A New Strategy for Patient-Specific Implant-Borne Dental Rehabilitation in Patients With Extended Maxillary Defects. Frontiers in Oncology. https://doi.org/10.3389/fonc.2021.718872

Korn, P., NC. Gellrich, S. Spalthoff, P. Jehn, F. Eckstein, F. Lentge, A. N. Zeller, and B. Rahlf. 2021. Managing the severely atrophic maxilla: Farewell to zygomatic implants and extensive augmentations? Journal of Stomatology, Oral and Maxillofacial Surgery. https://doi.org/10.1016/j.jormas.2021.12.007

Gellrich, NC., P. Korn, P. Jehn, F. Lentge, M. Schiller, and B. Rahlf. 2020. Versorgung extrem atrophierter Oberkiefer durch ein neues alternatives Verfahren. Quintessence Publishing Deutschland. Implantologie 2020 (4): 345-359.

Jehn, P., S. Spalthoff, P. Korn, M. Stoetzer, M. Gercken, NC. Gellrich, and B. Rahlf. 2020. Oral health-related quality of life in tumour patients treated with patient-specific dental implants. International Journal of Oral & Maxillofacial Surgery 49 (8): 1067-1072. doi.org/10.1016/j.ijom.2020.01.011

Gellrich, NC., B. Rahlf, R. Zimmerer, PC. Pott, and M. Rana. 2017. A new concept for implant-borne dental rehabilitation; how to overcome the biological weak-spot of conventional dental implants? Head Face Med 13 (17). doi.org/10.1186/s13005-017-0151-3

Gellrich, NC., R. Zimmerer, S. Spalthoff, P. Jehn, PC. Pott, M. Rana, and B. Rahlf. 2017. A customised digitally engineered solution for fixed dental rehabilitation in severe bone deficiency: A new innovative line extension in implant dentistry. Journal of Cranio-Maxillofacial Surgery 45 (10). doi.org/10.1016/j.jcms.2017.07.022

More news on IPS Implants® Preprosthetic

April 27, 2020 | Dental Tribune

Interview: IPS Implants® Preprosthetic is "a useful addition for a specific patient group"

Univ.-Prof. Dr. Dr. Nils-Claudius Gellrich (on the right) and Dr. Björn Rahlf (on the left) have already treated 47 patients with our IPS Implants® Preprosthetic enabling functionally stable immediate dental rehabilitation even in case of massive bone loss and independent of the jaw region. In an interview with the dental tribune, they report on the product development, application and their experiences with our patient-specific implants for preprosthetic treatment.

Picture credits: MHH, CMF Surgery, V. Pawlaczyk

FAQ

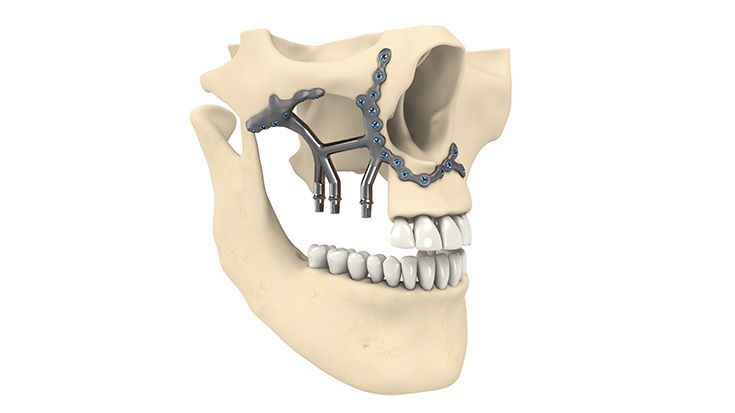
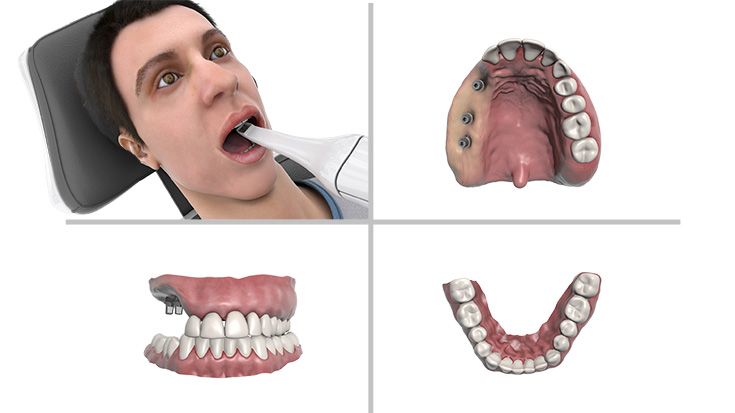
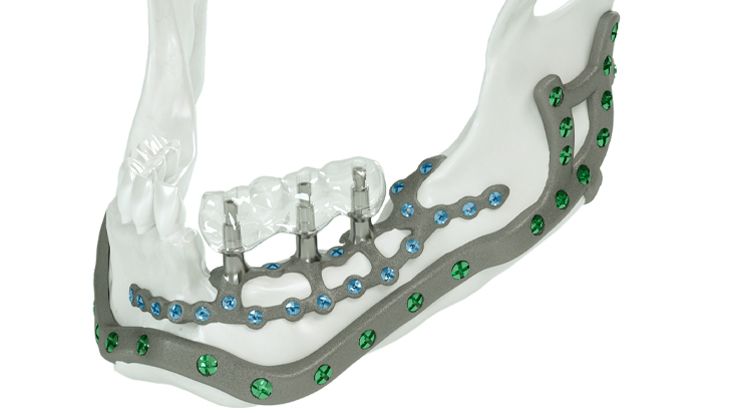
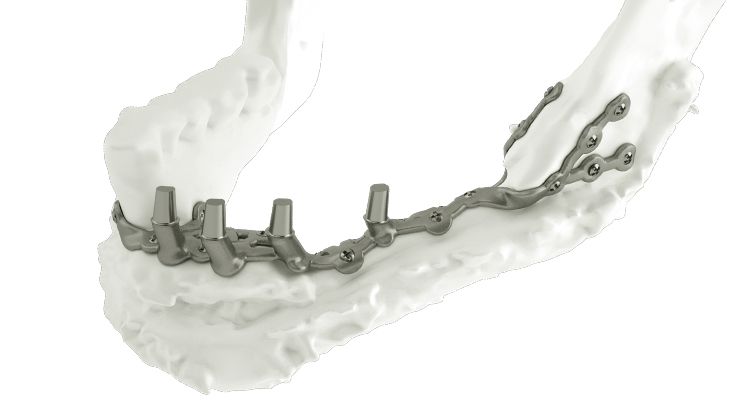
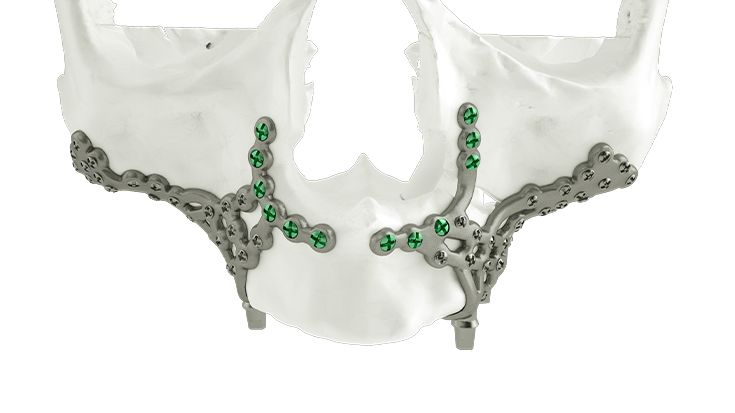
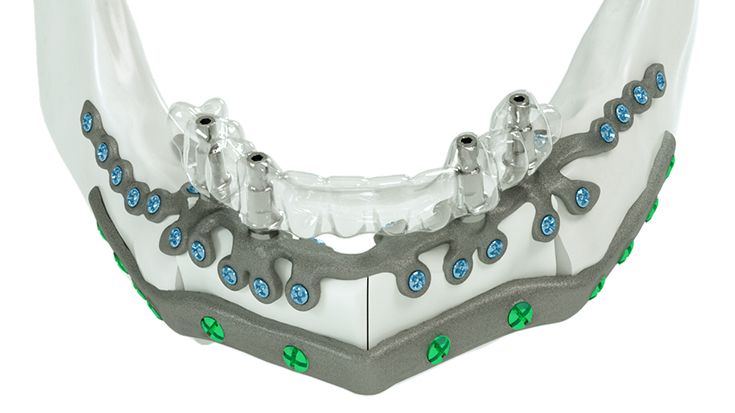
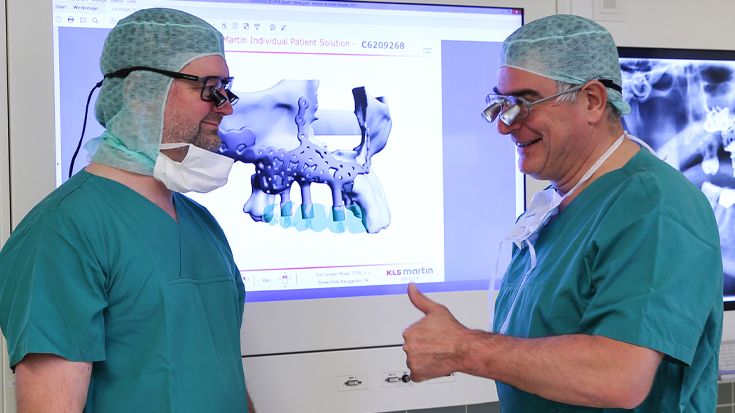
What do I need to take into account when planning IPS Implants® Preprosthetic? 

The Implant design has to be based necessarily on the following criteria: 


Functionally conditions 

  • Bite situation 
  • Mouth opening 
  • Opposite jaw situation 
  • Separation of anatomical units 


Anatomical conditions 

  • Soft tissue coverage and coating 
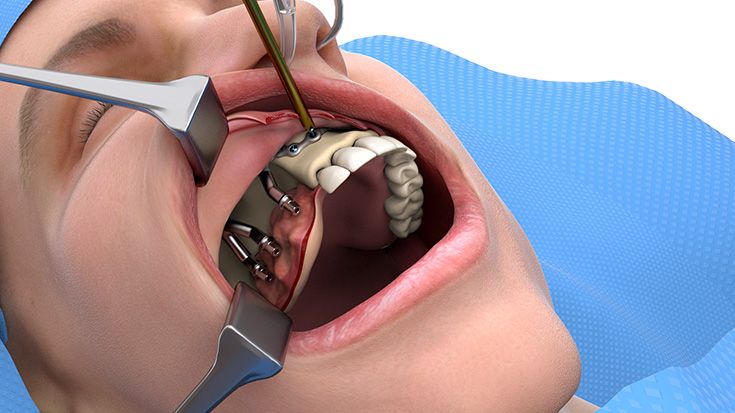
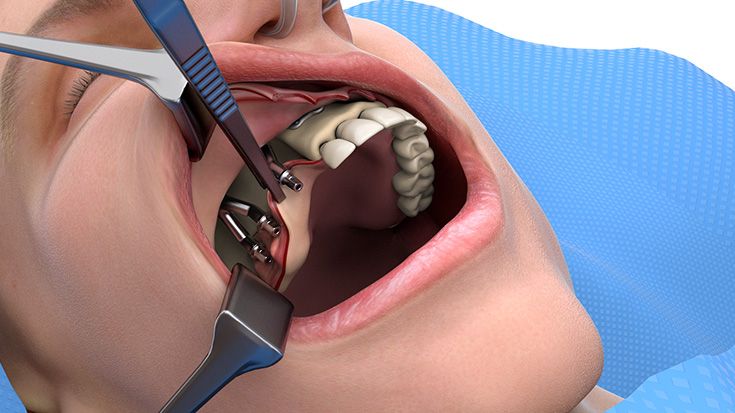
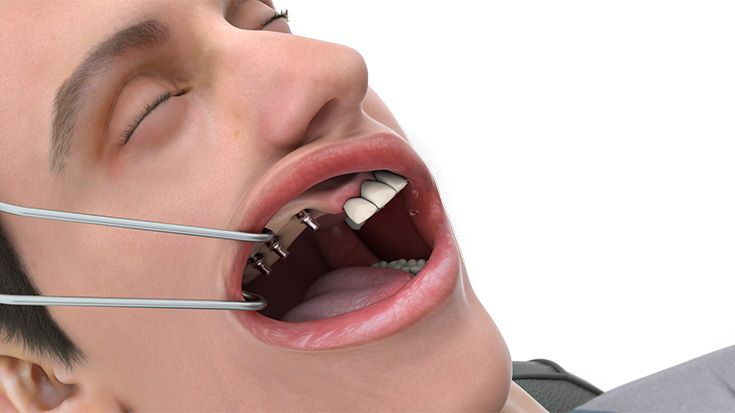
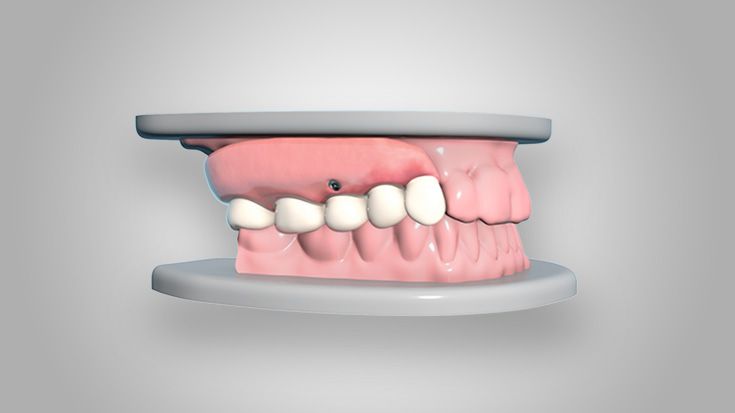
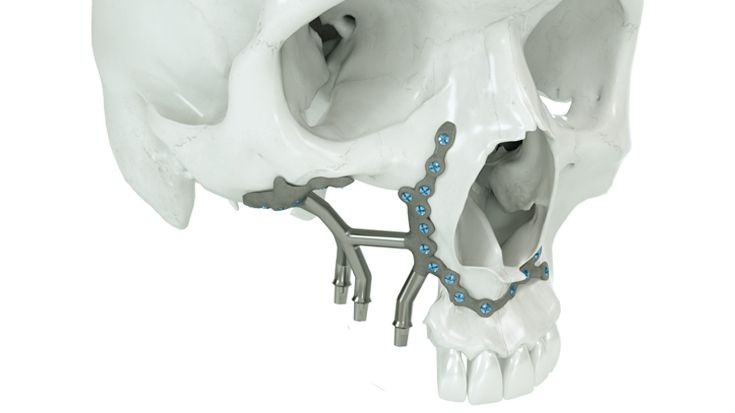
  • Bone supply and anchoring possibilities 
  • Distance to existing metal structures like dental implants, osteosynthesis plates, mesh, etc. 


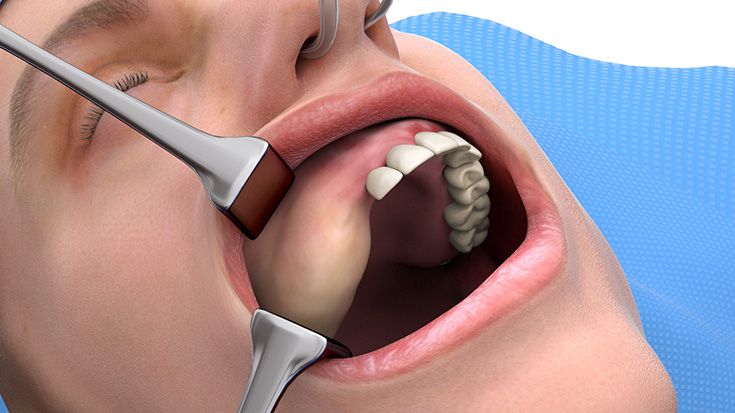
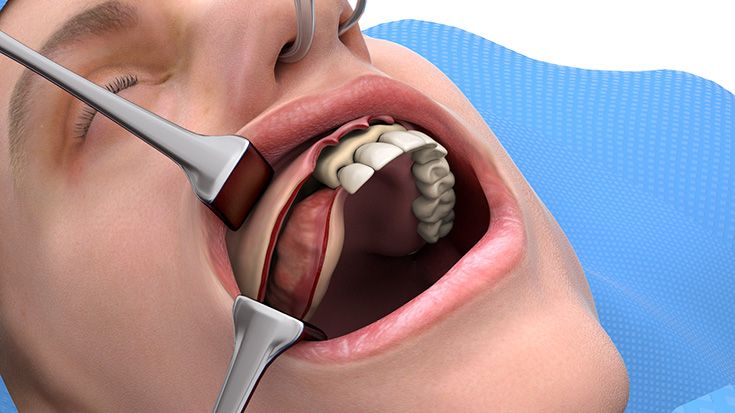
Therefore, only 3D data based planning is - just like for every complex surgical prosthodontic treatment for dental rehabilitation - not sufficient alone and only one element. Furthermore the strategy for the dental rehabilitation should be rather defensive. E.g. the dentition should be planned just up to the 2nd premolar or to the 1st molar depending on the mouth opening and the soft tissue situation. For example the anatomical units in the lower oral cavity area between the cheek, vestibulum, oral cavity and tounge are not separated through an immobile and thick enough soft tissue coating so that the mobile inner cheek is confluencing with the tounge underside. In this case there has to be a soft tissue separation through tissue transplantation. But this would be also necessary for the conventional dental implant born prosthodontic treatment. 

It is recommended to leave at least 6 months between the radiotherapy and the implant insertion. 

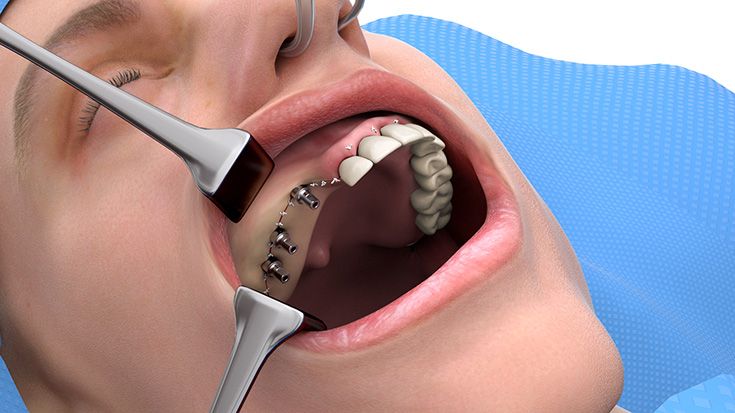
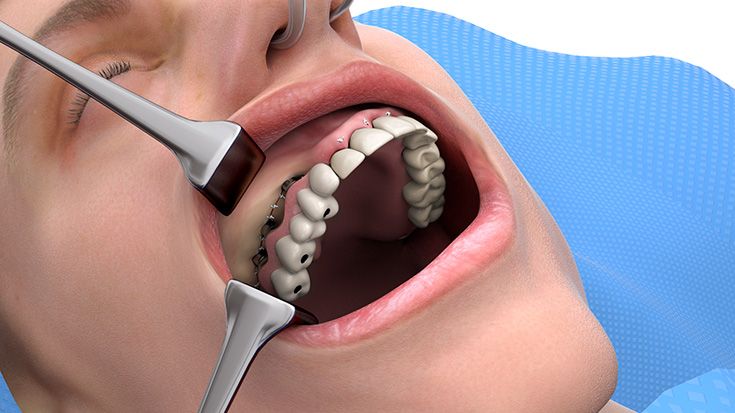
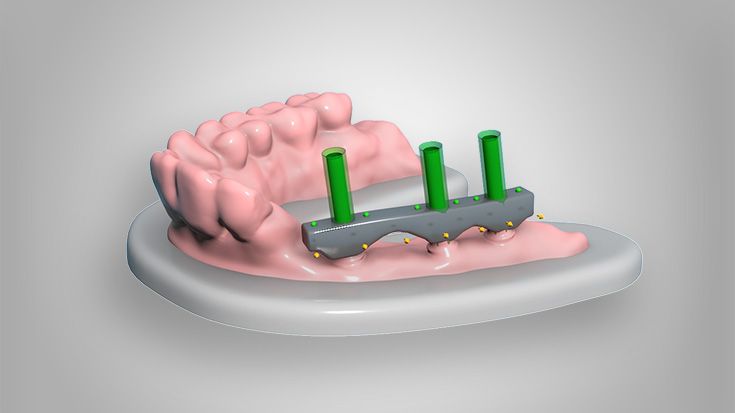
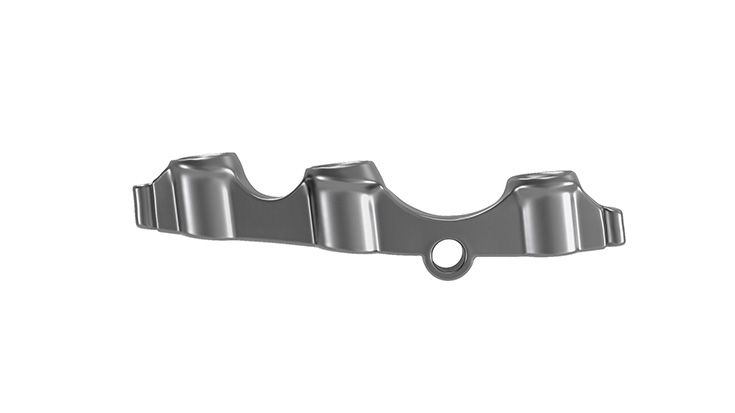
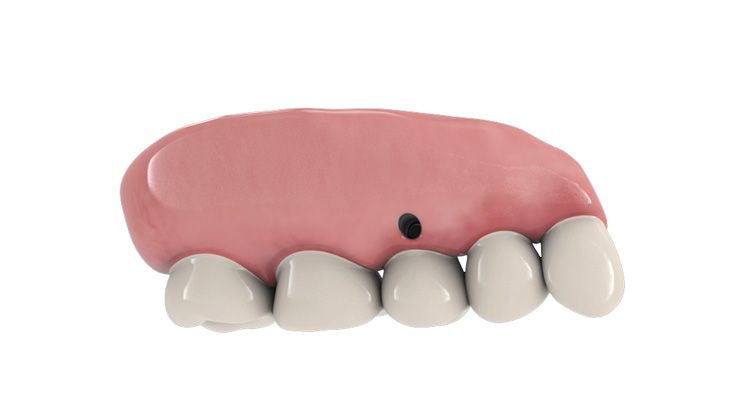
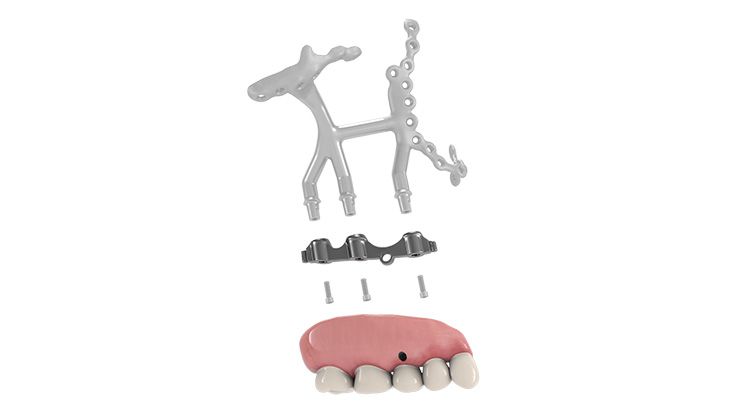
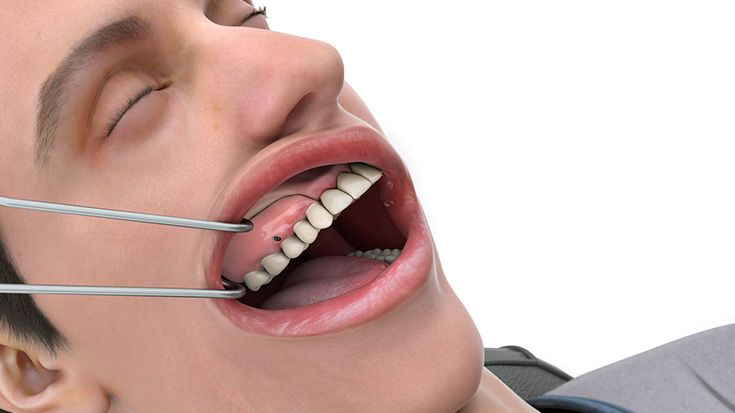
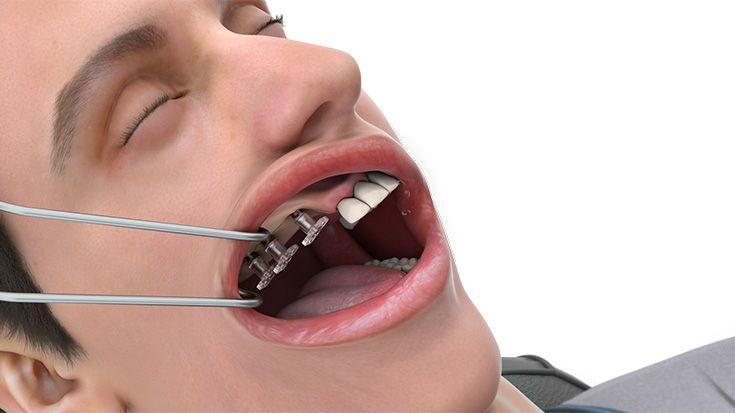
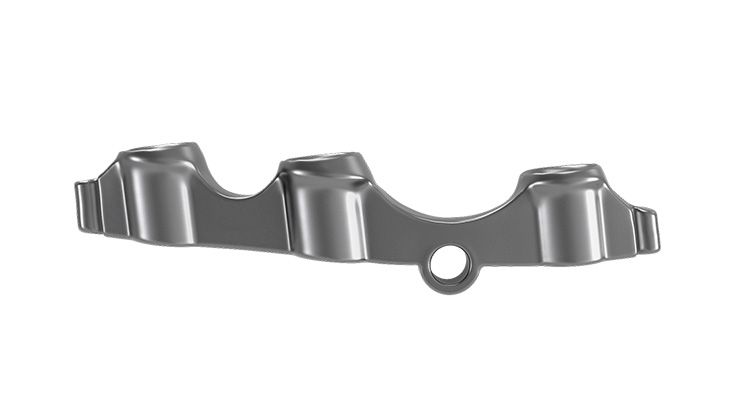
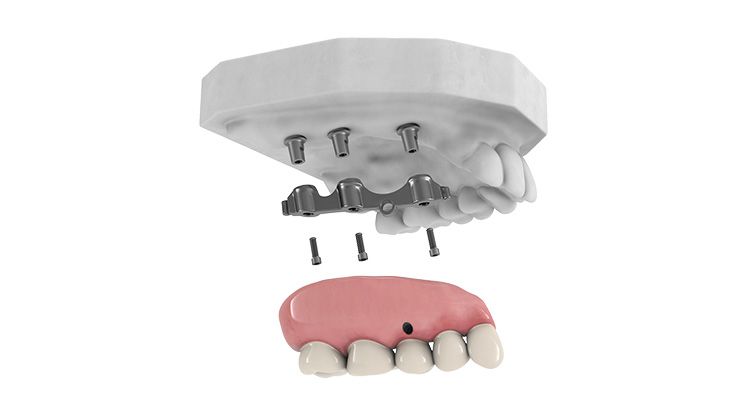
In general, there should be no cemented denture manufactured onto IPS Implants® Preprosthetic. Instead, the conditional removable prosthodontic solution (e.g. bar or cone anchored) should be preferred. 

If the patient has to receive radiotherapy after surgery will the presence of IPS Implants® Preprosthetic lead to any issues? 

The same risks apply to IPS Implants® Preprosthetic as for plate osteosynthesis. However, special care must be taken to ensure that the posts passing through the soft tissue are adequately covered with soft tissue. The same principles apply for anchoring as for plate osteosynthesis, since the screw connections are located far from the post passage. The influence of irradiation or interaction with the bone can be seen in the article by Stoll/Wächter, which was published very early.

Compared to conventional dental implants, IPS Implants® Preprosthetic still offers the advantage that the soft-tissue emergence point is not directly located at the bone-borne anchorage during radiation therapy. This advantage leads to better shielding. 

Required osteosynthesis accessories

For surgical treatment with IPS Implants® Preprosthetic the following osteosynthesis accessories are required:

  • Sufficient number of KLS Martin Osteosynthesis screws in the planned diameters and lengths
  • A screwdriver suitable for the planned osteosynthesis screws
  • A predrill suitable for the planned osteosynthesis screws
     

IPS Implants® Preprosthetic | Treatment workflow

IPS Implants® Preprosthetic | Treatment workflow
By loading the video, you accept YouTube's privacy policy. To play, accept YouTube cookies.

Legal basis for IPS Implants®

According to the regulation (EU) 2017/745, a custom-made product is a device specifically made in accordance with a written prescription of any person authorized by national law by virtue of that person's professional qualifications which gives, under that person's responsibility, specific design characteristics, and is intended for the sole use of a particular patient exclusively to meet their individual conditions and needs.

For this reason a separate inquiry is necessary in every IPS® case.

The written prescription is a release for the technical offer (design of the products). This is to be submitted in writing by the user at the same time as the required order for the economic offer if he/she agrees with the desired case planning.

Shipment is not permissible as a matter of principle without this mandatory regulatory document.

This site uses third party website-tracking-technologies to provide their services. I agree and can revoke or change my consent at any time with future effect.

Refuse Settings Accept ImprintPrivacy policy